Introduction
Today we are going to learn how to send informational emails from our website to one of our email addresses. For this project, we will be creating a working example using the popular email send platform, Twilio SendGrid.
Sending informational emails is extremely important because many websites have a contact form and if you want your customers or clients to send you emails then this is a great way to go about doing it. The alternative would be to just display your email address on the website and have them use an email client to send you messages. There are pros and cons to each one however today will be all about building a contact form and setting up our platform to send emails for us.
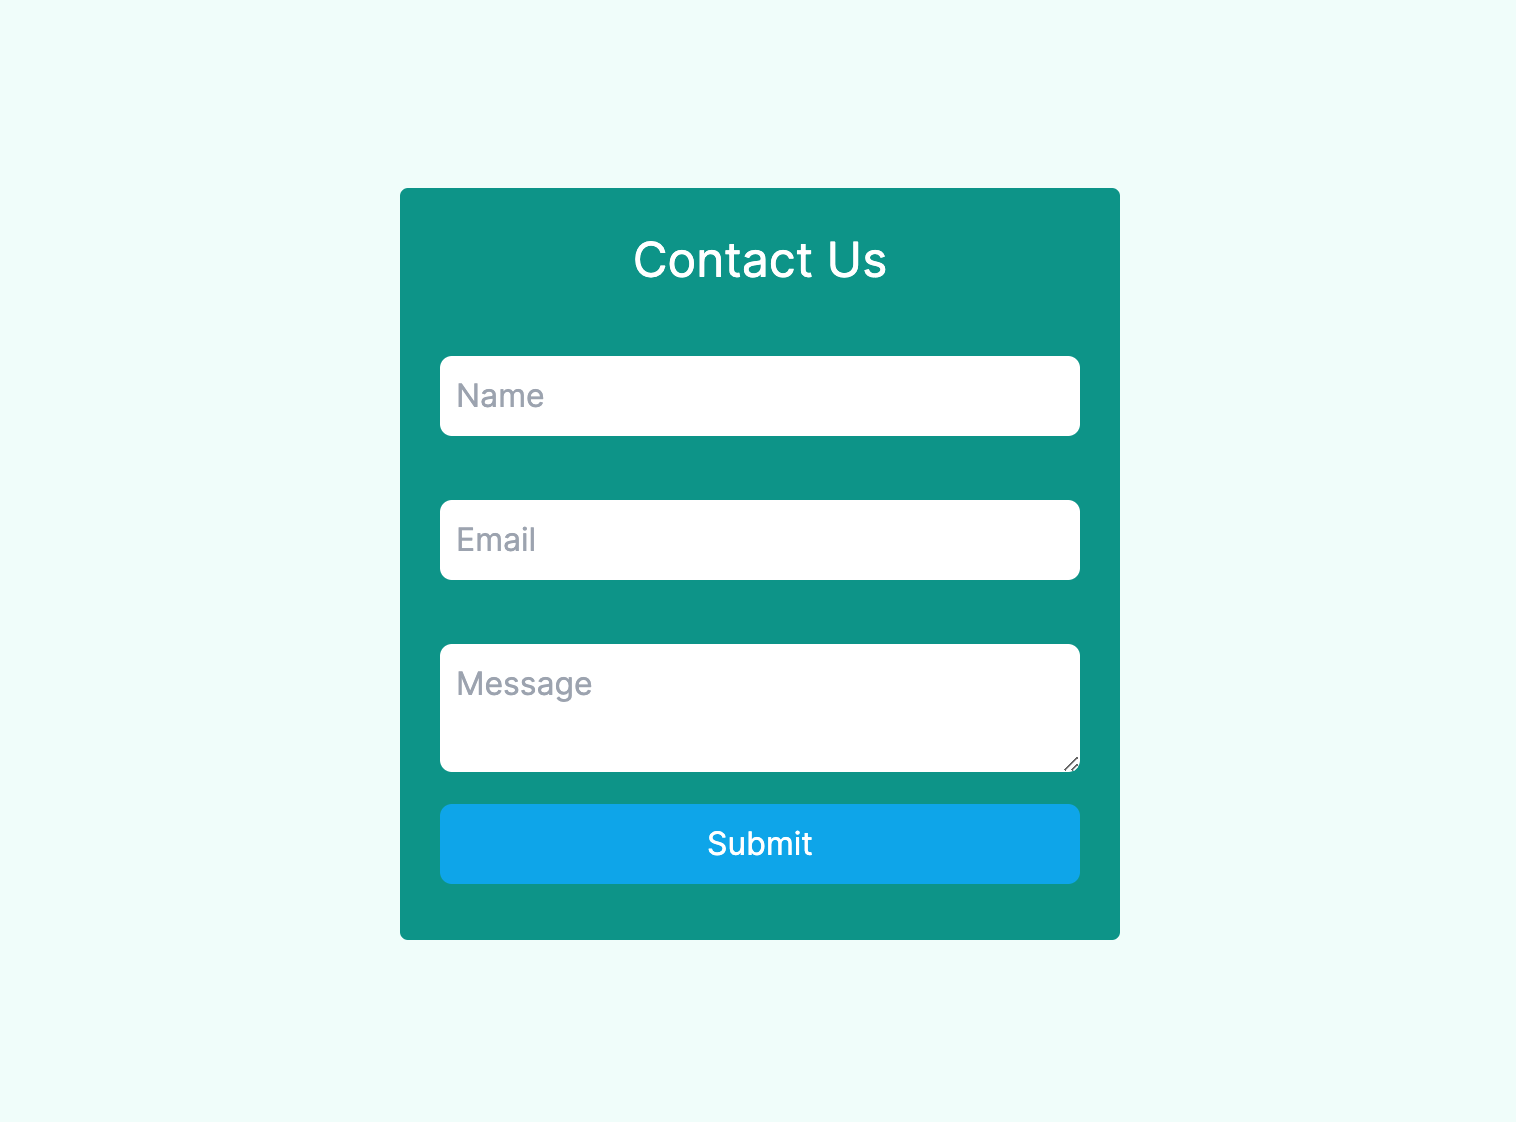
Our project will use Next.js for the front end and Next.js API routes for the backend so we won't need to set up a separate server, Next.js can handle all of it. But first, let's learn about cloud-based email delivery platforms and why we need them. You can see what it looks like below:
We can use a cloud-based email delivery platform to send lots of emails consistently to our customers and clients. The types of emails which we can send include transactional, marketing and informational. Now let's take a quick look at the difference between the 3 starting with transactional emails.
Transactional Emails
A transactional email is an automatic email delivered to you when you complete an action on a website or app, usually connected to a purchase or account activity. They give critical information and conclude a transaction or procedure that you started. An example of this is when you make an online purchase on a website like Amazon. After the purchase you automatically receive an email confirming your order.
Ok great, next up is marketing emails.
Marketing Emails
Marketing emails are sent with the intent of promoting a product or service. While transactional emails can have a commercial message, they aim to keep you informed and finish a procedure. We are all familiar with marketing emails which promote a product or a service. Like for example a new product launch from a store you subscribed to via email or the latest newsletter for a platform you subscribed to.
Lastly, let's learn about informational emails.
Informational Emails
Informational emails are much more like customer inquiries and are mostly informative or relational. These types of emails are not directly related to a single transaction, but rather seek information, assistance with a product or service, or give feedback. So for example a customer could be using a contact form on a website to send a message to a company regarding a product or service.
Some of the most popular cloud-based email delivery platforms are:
Alright with the introduction out the way let's start writing some code!
Our Project Setup
You can find the codebase for this project online on GitHub here SendGrid Contact Form.
Now onto the project. The first thing we need to do is create a Next.js project so find a location on your computer and run the commands below.
In the configuration we will need to use Tailwind CSS for the design and the App Router for the API so select those options.
npx create-next-app sendgrid-contact-form
Now we need to install React Hook Form because that is the package we are going to use for building our form. We also need to install the package for SendGrid. cd into the sendgrid-contact-form folder and then run this command to install the packages:
npm install react-hook-form @sendgrid/mail
Lastly, we have to create a .env.local file in our project root which is where we will store our API Keys for the platform so create the file now.
Ok that's it for now we can move on to the next sections where we will create our API routes, POST hook, and contact form. SendGrid offers a free plan so we won't need to pay anything.
Now lets go for it!
Sending emails using the Twilio SendGrid platform
Alright, the first thing we need to do is create an account on Twilio SendGrid.
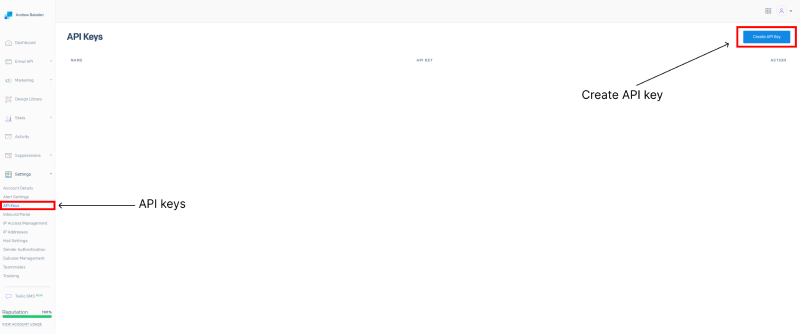
Next, navigate to the API Keys page under settings as seen in this screenshot:
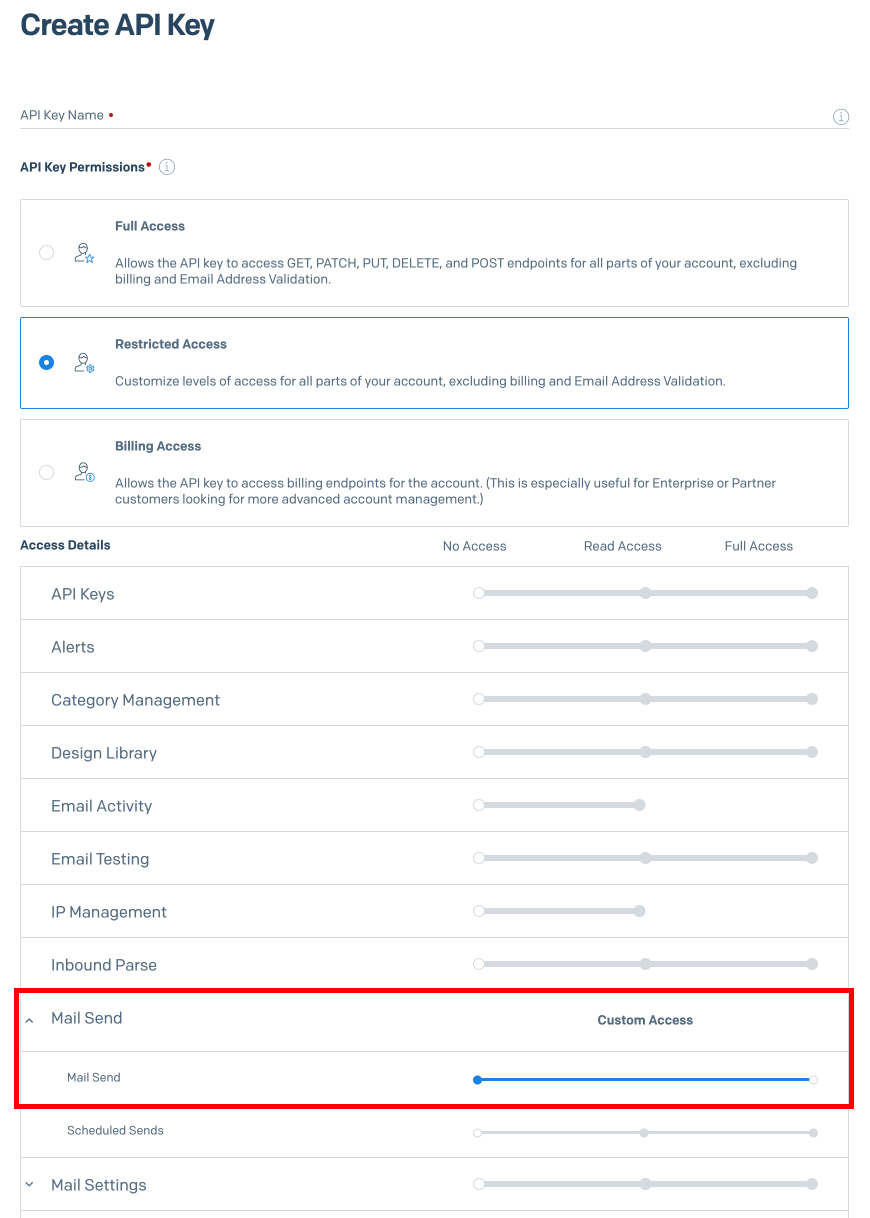
Now we need to create an API key. You can create one with Full Access or select Restricted Access and create a custom access for Mail Send as seen in this screenshot:
In the next screen, you should have an option for copying the API Key you just created. Save the key and add it to your .env.local file in the project as shown in this example:
NEXT_PUBLIC_SENDGRID_API_KEY=Your_API_KEY
All thats left is to verify an email address that we will use for sending out our emails. Go to settings and then Sender Authentication to verify a single sender as shown in the example image here:
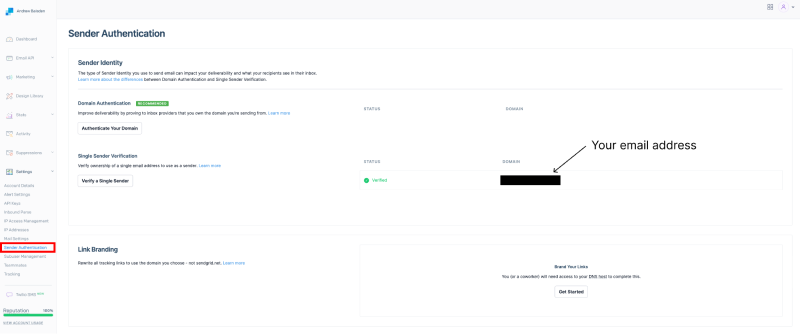
Ok, we are done with the platform setup we just need to create our API route, POST Hook and contact form page.
Let's set up our API route first because we can quickly test it to see if it's working using an API testing tool like Postman. Create an API route for SendGrid by creating this folder structure src/app/api/sendgrid/route.js.
Our code will go inside the route.js file so copy and paste this code into the file:
import sgMail from '@sendgrid/mail';

sgMail.setApiKey(process.env.NEXT_PUBLIC_SENDGRID_API_KEY);

export async function POST(req) {
  try {
    const { to, from, subject, text, html } = await req.json();

    console.log(to, from, subject, text, html);

    const msg = {
      to: to, // Change to your recipient
      from: from, // Change to your verified sender
      subject: subject,
      text: text,
      html: html,
    };

    await sgMail.send(msg);

    return Response.json({ message: 'Email sent' });
  } catch (error) {
    console.error(error);

    return Response.json({ error: error.message });
  }
}
This file is for a POST endpoint at http://localhost:3000/api/sendgrid. It collects the to, from, subject, text, and html from a JSON object which is sent in a POST request. It then sends that object to SendGrid which collects our form messages. We can see this working right now using Postman or an alternative.
Get the server running for our Next.js application by running this command in the root folder:
npm run dev
Now use the example images as a reference of how you should create a POST request. You just need to send the data as JSON and the to email address needs to be one of your verified email addresses on SendGrid otherwise it wont work.
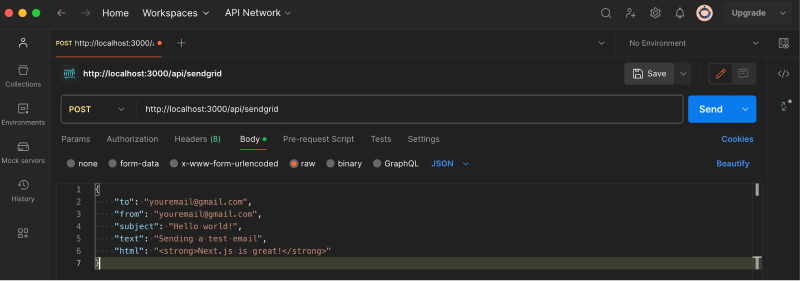
This is the JSON data I used in the request:
Remember to use your verified email in the to field.
{
  "to": "youremail@gmail.com",
  "from": "youremail@gmail.com",
  "subject": "Hello world!",
  "text": "Sending a test email",
  "html": "<strong>Next.js is great!</strong>"
}
Check your email inbox and you should have received an email. You can also view the emails sent in the activity feed section on the SendGrid platform as shown here:
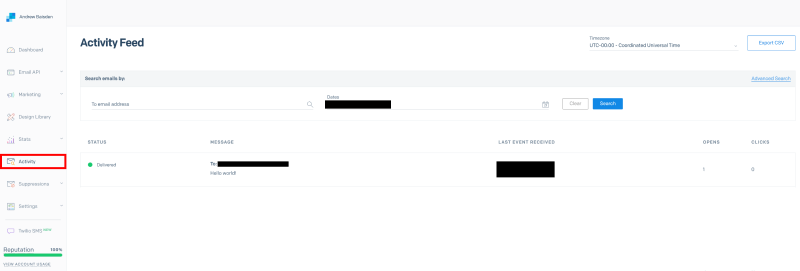
Ok, just the frontend left to do and this section is complete. We got our form data working on the backend all thats left is to create a user friendly contact form which can send the data to our backend which is then sent to SendGrid.
Start by creating a custom hook file for our backend POST requests in src/app/hooks/usePost.js. Then add this code to the usePost.js file:
import { useState } from 'react';

export function usePost() {
  const [isLoading, setIsLoading] = useState(false);
  const [error, setError] = useState(null);
  const [response, setResponse] = useState(null);
  const postRequest = async (url, formData) => {
    setIsLoading(true);
    setError(null);
    setResponse(null);

    try {
      const response = await fetch(url, {
        method: 'POST',
        headers: {
          'Content-Type': 'application/json',
        },

        body: JSON.stringify(formData),
      });

      const responseData = await response.json();

      if (response.ok) {
        setResponse(responseData);
      } else {
        setError(responseData);
      }
    } catch (error) {
      setError(error);
    } finally {
      setIsLoading(false);
    }
  };

  return { isLoading, error, response, postRequest };
}
Good, now we need to add this code to our page.js file. This is the code used for creating our form which has validation and sends our data to the backend.
'use client';

import { useForm } from 'react-hook-form';
import { useState } from 'react';
import { usePost } from '@/app/hooks/usePost';

export default function ContactForm() {
  const [fromName, setFromName] = useState('');
  const [fromEmail, setFromEmail] = useState('');
  const [message, setMessage] = useState('');
  const [formSent, setFormSent] = useState('');
  const { postRequest } = usePost();

  const {
    register,
    handleSubmit,
    formState: { errors },
  } = useForm();

  return (
    <div className="h-screen flex items-center justify-center">
      <form
        onSubmit={handleSubmit(() => {
          const sendForm = async () => {
            try {
              const formData = {
                to: fromEmail, // Change to your recipient
                from: 'youremail@gmail.com', // Change to your verified sender
                subject: `Email enquiry from ${fromName}`,
                text: message,
                html: `
                    Hello there!!!,
                    <br /><br />
                    You got a new message from ${fromName}.
                    <br /><br />
                    Message: ${message}
                    `,
              };

              // Local developer testing API Route
              postRequest('http://localhost:3000/api/sendgrid', formData);

              const formMessageText = new Promise((resolve, reject) => {
                setTimeout(() => {
                  setFormSent('Message Sent!');
                  setTimeout(() => {
                    setFormSent('');
                    setFromName('');
                    setFromEmail('');
                    setMessage('');
                  }, 5000);
                }, 0);
              });
            } catch (error) {
              console.log(error);
            }
          };

          sendForm();
        })}
        className="flex flex-col bg-teal-600 p-5 rounded"
      >
        <div className="text-white">
          <h1 className="text-center text-2xl mb-4">Contact Us</h1>
        </div>

        <input
          {...register('name', { required: true })}
          aria-invalid={errors.name ? 'true' : 'false'}
          placeholder="Name"
          className="rounded-md p-2 mt-4 mb-4 text-black w-80"
          value={fromName}
          onChange={(e) => setFromName(e.target.value)}
        />

        {errors.name?.type === 'required' && (
          <p
            role="alert"
            className="text-white text-center font-bold mb-6 bg-rose-600"
          >
            A name is required
          </p>
        )}

        <input
          {...register('email', {
            required: true,

            pattern: /^[\w-\.]+@([\w-]+\.)+[\w-]{2,4}$/g,
          })}
          aria-invalid={errors.email ? 'true' : 'false'}
          placeholder="Email"
          className="rounded-md p-2 mt-4 mb-4 text-black w-80"
          value={fromEmail}
          onChange={(e) => setFromEmail(e.target.value)}
        />

        {errors.email?.type === 'required' && (
          <p
            role="alert"
            className="text-white text-center font-bold mb-6 bg-rose-600"
          >
            A email address is required
          </p>
        )}

        {errors.email?.type === 'pattern' && (
          <p
            role="alert"
            className="text-white text-center font-bold mb-6 bg-rose-600"
          >
            A valid email address is required
          </p>
        )}

        <textarea
          {...register('message', { required: true })}
          aria-invalid={errors.message ? 'true' : 'false'}
          placeholder="Message"
          className="rounded-md p-2 mt-4 mb-4 text-black w-80"
          value={message}
          onChange={(e) => setMessage(e.target.value)}
        />

        {errors.message?.type === 'required' && (
          <p
            role="alert"
            className="text-white text-center font-bold mb-6 bg-rose-600"
          >
            A message is required
          </p>
        )}

        <input
          type="submit"
          className="bg-sky-500 rounded-md bg-gray-900 p-2 text-white hover:bg-black"
          style={{ cursor: 'pointer' }}
        />

        <p className="text-white text-center mt-2">{formSent}</p>
      </form>
    </div>
  );
}
Lastly just replace all the code in the globals.css file with this code to change the background colour and we are done:
@tailwind base;
@tailwind components;
@tailwind utilities;

body {
background-color: rgb(240 253 250);
}
Thats its, just get the server running if it is not already and give it a try. Our contact form should be sending emails to our email address and they are also logged in the activity feed section on SendGrid.
Conclusion
Sending emails from a website is a necessary process if you are planning to have a contact form on your website. Today we learned how to do it using SendGrid so you can see that the setup is not as challenging as you might think it is. Of course there are numerous other email send platforms and I listed some of them earlier. The setup process is quite similar so if you learn how to use one then it becomes much easier to use a different one.

