Introduction
This will be a course for becoming a Complete Modern React Developer in 2022. The only three topics which are not covered in this course are Redux, GraphQL and React Native which could be covered in a future course. TypeScript is going to be the main programming language covered however if you already know JavaScript then you should find it quite easy to understand because the syntax is not that much different.
We will be building a super basic Twitter clone that has CRUD functionality for posting, reading and deleting tweets.
This course will give you the skills and knowledge to become a Software Developer across the full stack. In this course you will learn:
- Node.js (express.js and nest.js)
- MongoDB and PostgreSQL
- Docker
- TypeScript
- React (Hooks and Context API)
- Storybook.js
- Jest, React Testing Library, and Cypress (Unit Testing, Integration Testing, End to End Testing)
Prerequisites
Ensure that you have your development environment setup and install all of the tools/libraries listed in the introduction. I work on a Mac so some of the tools I mention will be macOS only however you should be able to find alternatives and be able to follow along if you use Windows or Linux.
MongoDB Setup
You will need to install the following tools for working with MongoDB NoSQL databases. MongoDB Compass is a GUI for working with MongoDB databases. And mongosh is a MongoDB shell for working with MongoDB databases using the command line.
PostgreSQL Setup
You will need to install the following tools for working with PostgreSQL databases. Postgres.app is an app for managing PostgreSQL databases. And Pgcli is a command line interface for Postgres which comes with auto-completion and syntax highlighting. It is the PostgreSQL equivalent of mongosh.
My preference is Valentina Studio when it comes to using a GUI for working with PostgreSQL databases. It's a great tool because it can even connect to MongoDB and MySQL databases. There are alternatives though like PgAdmin so just use whatever you feel comfortable with.
Postgres.app Pgcli Valentina Studio
Setting up the backend
In this section you will learn how to setup a Node backend using both Express.js and Nest.js. Both frameworks will connect to a MongoDB and PostgreSQL database using different endpoints. And as a bonus you will also learn some DevOps when we put a MongoDB and PostgreSQL database inside of a Docker container.
Docker basically gives developers the ability to package applications inside of containers. So essentially you can just have a database inside of a Docker container which any external application will be able to connect to. With this type of setup you don't even need to install or setup a database on your local machine. You can just have everything running inside of a Docker container and this setup will run exactly the same on anyones machine.
I think this a great alternative to having a local installation and with this knowledge it gives you another option for interacting with databases. This workflow does not require a huge setup and you can use either the GUI or command line to interact with your database inside of the Docker container the same way you would if it was local or online.
Local Database Setup
Pgcli Commands mongosh Commands
MongoDB Local
Open your command line tool I will be using Hyper and run the command below to connect to your local MongoDB installation.
mongosh
Firstly run this command which will show you which database you are using. It should return test which is the default database.
db
Now run the command below which will show you which databases you currently have created.
show dbs;
Next run the command to create a database called twitter.
use twitter;
Finally create a collection using the command below and when you use the command show dbs; again in the command line you should see the database called twitter which you created.
db.createCollection('contents');
Lastly we will add some starting data copy and paste the code below into your command line. If you run this command db.contents.find().pretty() in your command line after you have inserted the data then you will be able to see the data in the table.
db.contents.insertMany([ {tweet: "Hello World!", img: ""}, {tweet: "Content creation and programming are basically full time jobs. I have enough projects and work to keep me busy for years. Working in tech is definitely going to entertain you for a long time which is why so many people want to transition into this field.", img: ""}, {tweet: "JavaScript developers are forever in high demand", img: ""} ])
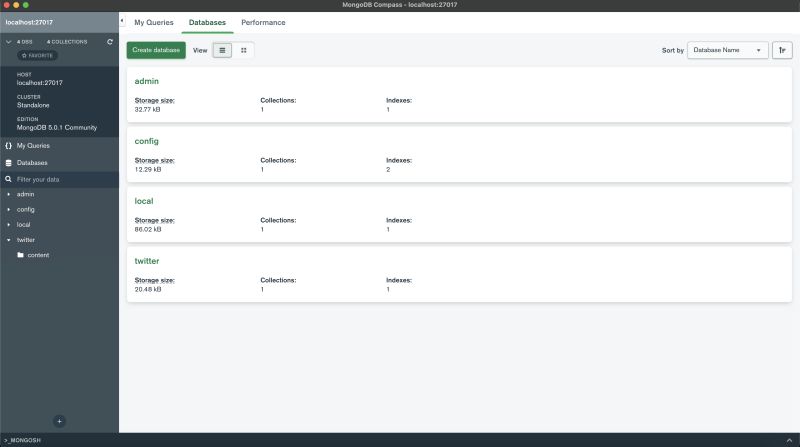
If you open the MongoDB Compass application on your computer and connect to your local installation using the connection string mongodb://localhost:27017 then you should be able to see all of your databases including the one we just created in the GUI. So now you are setup to use either the command line or the GUI for interacting with your databases.
PostgreSQL Local
Before you do anything check that your PostgreSQL database is running locally. If it's not running then you might get an error in the command line when you run the command pgcli. On macOS I will be using the Postgres.app so get it running on your machine and then it should show up in your menu bar at the top of your operating system.
Now go to the command line and run the command below to connect to your local PostgreSQL installation.
pgcli
Running the command below will show you all of your PostgreSQL databases.
\l
Copy and paste the SQL query below into your pgcli command line window to create a database called twitter. Now if you run the command \l again in that same window you should see all of the databases including the one we just created.
CREATE DATABASE twitter;
Next we need to connect to the database in the same window so use the command below to do that.
\c twitter
Next we have to create a table and add some data which will go inside of the database twitter. Copy and paste the SQL code below into your command line window.
CREATE TABLE contents (

id UUID DEFAULT gen_random_uuid (),

tweet VARCHAR(280) NOT NULL,

img VARCHAR(500) NOT NULL

);

INSERT INTO contents (tweet, img)

VALUES ('Hello World!', ''), ('Content creation and programming are basically full time jobs. I have enough projects and work to keep me busy for years. Working in tech is definitely going to entertain you for a long time which is why so many people want to transition into this field.', ''), ('JavaScript developers are forever in high demand', '');
If you open the Postgres.app application on your computer you should see all of the databases including the one which we just created.
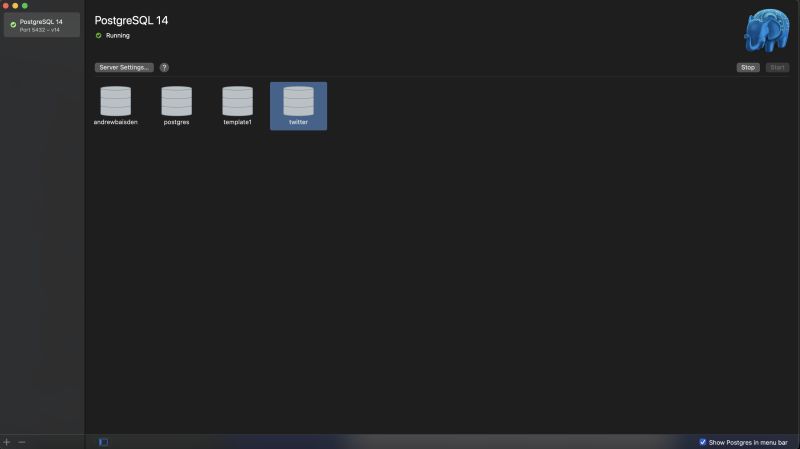
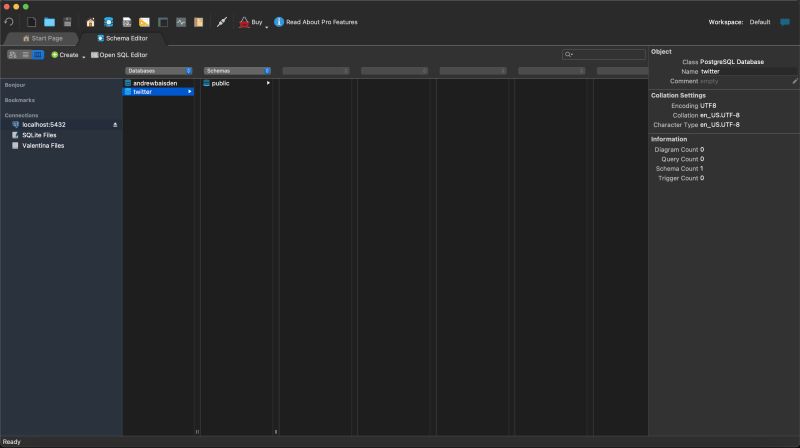
And if you connect to Valentina Studio or your database GUI of choice you should be able to see the database you created.
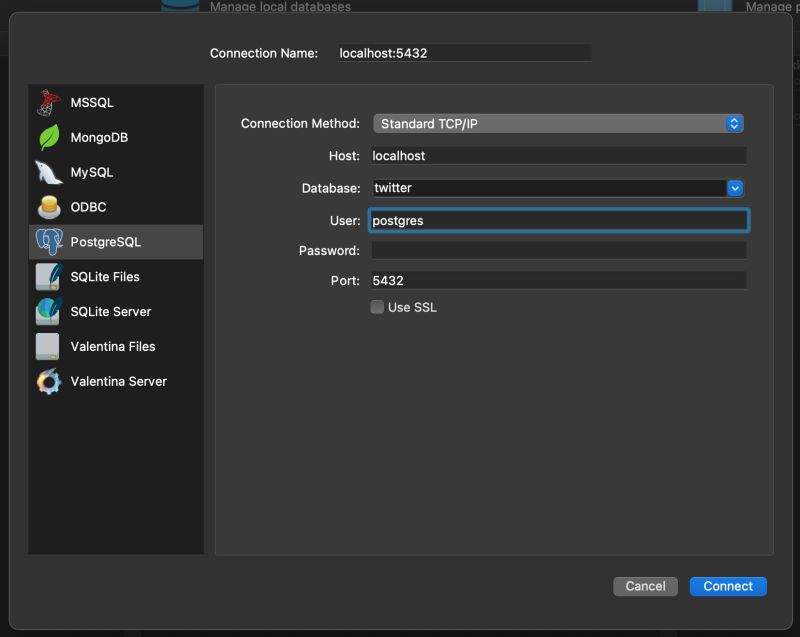
PostgreSQL database connection settings
Valentina Studio
Docker database setup
Start the Docker application on your computer and follow the steps below for each database. Firstly create a folder on your local machine called complete-react-developer
and then cd into using the command line.
MongoDB Docker
Double check that you are inside of the root folder for complete-react-developer and then run the commands below to setup the project.
mkdir docker-twitter-mongodb
cd docker-twitter-mongodb
touch docker-compose.yml
Open that folder in your code editor and add the following code to the docker-compose.yml file.
docker-compose.yml
Be careful with the yaml code formatting if the indentation is not correct it will give you errors.
version: '3.9'
services:
  mongo_db:
    container_name: db_container
    image: 'mongo:latest'
    restart: always
    ports:
      - '2717:27017'
    volumes:
      - 'mongo_db:/data/db'
volumes:
  mongo_db: {}
Now run the code below to start the docker container with the MongoDB database.
docker compose up
Assuming everything went correctly you should have a MongoDB Database running inside of a Docker Container.

Connecting to the MongoDB Database inside the Docker Container
It is now possible to connect to the local MongoDB Database and the MongoDB Docker Database simultaneously because they are both configured to run on different ports.
The local MongoDB Database is on port 27017 so use the command below for connecting to the local mongodb database.
mongosh --port 27017
The connection string for MongoDB Compass will be the following.
mongodb://localhost:27017
The MongoDB Docker Database is on port 2717 so use the command below for connecting to the Docker MongoDB database.
mongosh --port 2717
The connection string for MongoDB Compass will be the following.
mongodb://localhost:2717
So now you have two MongoDB databases for Twitter one local and one in a Docker Container. Let's add some data to the database which is also going to persist even if you delete the container.
In the command line open a mongosh connection to the MongoDB Database inside of the Docker container.
mongosh --port 2717
Run the commands below. You are creating a database called twitter with a collection called contents. And then you are inserting some data into the database.
use twitter;

db.createCollection('contents');

db.contents.insertMany([ {tweet: "Hello World!", img: ""}, {tweet: "Content creation and programming are basically full time jobs. I have enough projects and work to keep me busy for years. Working in tech is definitely going to entertain you for a long time which is why so many people want to transition into this field.", img: ""}, {tweet: "JavaScript developers are forever in high demand", img: ""} ]);
Now when you run the command db.contents.find().pretty(); inside of the command line it should return the data you just inserted. If you go to MongoDB compass and use this connection string mongodb://localhost:2717 you should see the twitter database with the data inside.
PostgreSQL Docker
Check that you are inside of the root folder for complete-react-developer and then run the commands below to setup the project.
mkdir docker-twitter-postgresql
cd docker-twitter-postgresql
touch docker-compose.yml
mkdir sql
cd sql
touch twitter.sql
cd ..
Open that folder in you code editor and add the following code to the docker-compose.yml and twitter.sql files.
docker-compose.yml
Be careful with the yaml code formatting if the indentation is not correct it will give you errors.
version: '3.7'
services:
  postgres:
    image: postgres:latest
    restart: always
    environment:
      - POSTGRES_USER=twitter
      - POSTGRES_PASSWORD=twitter
      - POSTGRES_DB=twitter
    ports:
      - '5433:5432'
    volumes:
      - ./postgres-data:/var/lib/postgresql/data
      # copy the sql script to create tables
      - ./sql/twitter.sql:/docker-entrypoint-initdb.d/twitter.sql
twitter.sql
CREATE TABLE contents (

id UUID DEFAULT gen_random_uuid (),

tweet VARCHAR(280) NOT NULL,

img VARCHAR(500) NOT NULL

);

INSERT INTO contents (tweet, img)

VALUES ('Hello World!', ''), ('Content creation and programming are basically full time jobs. I have enough projects and work to keep me busy for years. Working in tech is definitely going to entertain you for a long time which is why so many people want to transition into this field.', ''), ('JavaScript developers are forever in high demand', '');
Now run the code below to start the Docker Container with the PostgreSQL database.
docker compose up
When you see the log that says database system is ready to accept connections you will know that it's working. This can also be verified in the Docker Desktop Application if you check it you should see the container running.

What we have just done is setup a PostgreSQL database which will reside inside of a Docker container. This database is even going to have some prebuilt data from the SQL script that we created.
Connecting to the PostgreSQL Database inside the Docker Container
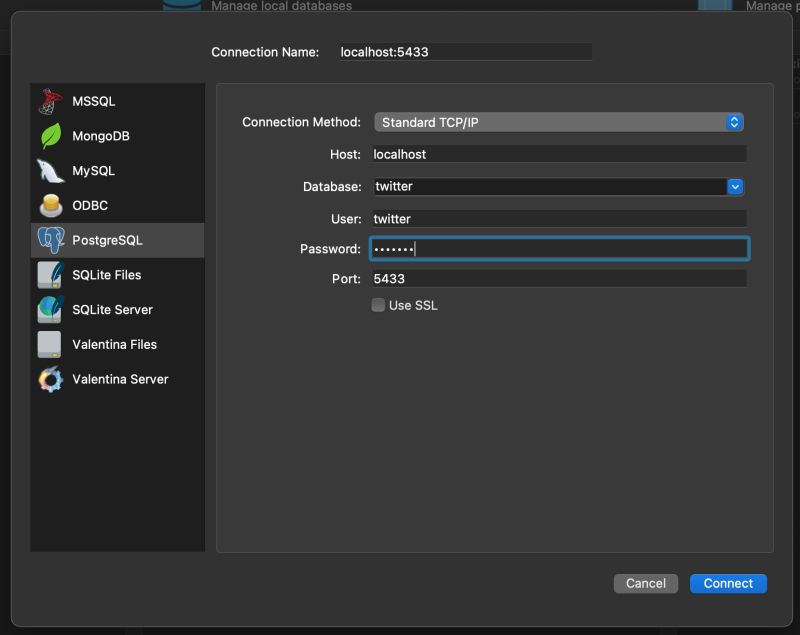
The docker-compose.yml file inside of the docker-twitter-postgresql folder has a port mapping of 5433:5432. 5433 is the local port and 5432 is the docker port which is also the default for Postgres. I did it this way so that we can use the Postgres app on port 5432 locally and run the Docker database on port 5433 simultaneously.
So here is where the magic happens! Use the connection credentials in the image below and you should be able to connect to the PostgreSQL database inside of the docker container!
The password is twitter by the way and you can find the credentials inside of the docker-compose.yml file.
Alternatively, you can also use pgcli to connect to the database in the command line by using the command below. The password is twitter like earlier.
pgcli -h localhost -p 5433 -u twitter -d twitter
So now we have a local PostgreSQL database called twitter on port 5432. And a Docker PostgreSQL database called twitter on port 5433. Valentina Studio can connect to both of them simultaneously and you can run all of your SQL queries. Whats more the PostgreSQL database inside of the Docker container can persist its data. If you were to delete the running Docker container and then run the command docker compose up again everything will remain the same!
Use the command docker compose down to stop the Docker container from running if you need to.
Congratulations you just learnt the basics of MongoDB, PostgreSQL and Docker!
Node backend setup
This will be split into two sections. One for creating a backend using Express.js and TypeScript. And another for creating a backend using Nest.js and TypeScript so you can see the difference between the two and learn alternative ways for developing a backend in Node.
So there will be 4 Node backends to play around with:
- backend-express-mongodb
- backend-express-postgresql
- backend-nest-mongodb
- backend-nest-postgresql
A REST API testing tool will be needed so that you can test the various routes and endpoints. These are my top 3 preferences feel free to use something else if you want to.
Postman Thunder Client Insomnia
You don't need to create all of these backends because when we create the React frontend it will only require one backend but this is still good knowledge worth learning. And obviously you could just have one backend that connects to both MongoDB and PostgreSQL it's just easier to explain in these examples.
Express App
Backend Express MongoDB
Be certain that you are inside of the folder complete-react-developer.
Run the commands below to scaffold your project.
mkdir backend-express-mongodb
cd backend-express-mongodb
tsc --init
npm init -y
npm i express @types/express @types/node ts-node cors @types/cors mongoose @types/mongoose typescript rimraf copy-files dotenv nodemon
touch .env
mkdir src
cd src
touch app.ts
mkdir controllers models routes
touch controllers/Admin.ts
touch models/Twitter.ts
touch routes/Admin.ts
cd ..
Open the project in your code editor and go to the tsconfig.json file inside of the root folder and enable these properties.
"rootDir": "./src" /* Specify the root folder within your source files. */,
"moduleResolution": "node" /* Specify how TypeScript looks up a file from a given module specifier. */,
"outDir": "./dist/src" /* Specify an output folder for all emitted files. */,
In the next step open the package.json file and add these run scripts.
"scripts": {

"start": "node dist/src/app.js",

"dev": "nodemon src/app.ts",

"clean": "rimraf dist/",

"build": "npm run clean && tsc && npm run copy-files",

"copy-files": "copyfiles -u 1 src/**/*.html src/**/*.css src/**/*.json dist/src"

},
Run Scripts
start The start script runs the application using Node without auto reload when there are updates to the files.
dev The dev script uses nodemon to automatically auto reload and update the files when there are changes.
clean The clean script deletes the dist folder.
build The build script deletes the dist folder and then automatically copies all of the files and puts them back into the dist folder.
copy-files The copy files script is used for copying the files from one directory to a different one.
Adding the code
Lastly add the code below to their corresponding files.
controllers/Admin.ts
import { Response, Request } from 'express';

import mongoose from 'mongoose';

import Twitter from '../models/Twitter';

export const getTweets = (req: Request, res: Response): void => {
    Twitter.find((err, data) => {
        console.log(data);

        res.json(data);

        if (err) {
            console.log(err);
        }
    });
};

export const getTweet = async (req: Request, res: Response): Promise<any> => {
    const tweetId = req.params.tweetId;

    console.log('Tweet ID', tweetId);

    // This line of code fixes the CastError: Cast to ObjectId failed for value "favicon.ico" (type string) at path "_id" for model "contents"

    if (!mongoose.Types.ObjectId.isValid(tweetId)) return false;

    await Twitter.findById(tweetId).exec();

    Twitter.findById(tweetId, (err: any, tweet: any) => {
        console.log(tweet);

        res.json(tweet);

        if (err) {
            console.log(err);
        }
    });
};

export const postTweet = (req: Request, res: Response) => {
    const { tweet, img } = req.body;

    const twitter = new Twitter({ tweet: tweet, img: img });

    twitter.save();

    console.log('Tweet Created');

    res.status(201).json({ msg: 'Tweet Created' });
};

export const updateTweet = (req: Request, res: Response) => {
    const tweetId = req.params.tweetId;

    const { tweet, img } = req.body;

    Twitter.findByIdAndUpdate(tweetId, { tweet: tweet, img: img }).then(() => {
        console.log(`Tweet ${tweetId} Updated`);

        res.json({ msg: `Tweet ${tweetId} Updated` });
    });
};

export const deleteTweet = (req: Request, res: Response) => {
    const tweetId = req.body.tweetId;

    Twitter.findByIdAndRemove(tweetId, () => {
        res.json({ msg: `Tweet ${tweetId} Deleted` });
    });
};
models/Twitter.ts
import { Schema, model } from 'mongoose';

interface Twitter {
    tweet: string;

    img: string;
}

const schema = new Schema<Twitter>({
    tweet: { type: String, required: true },

    img: { type: String, required: false },
});

const TwitterModel = model<Twitter>('contents', schema);

export default TwitterModel;
routes/Admin.ts
import express from 'express';

import { getTweets, getTweet, postTweet, updateTweet, deleteTweet } from '../controllers/Admin';

const router = express.Router();

router.get('/', getTweets);

router.get('/:tweetId', getTweet);

router.post('/delete', deleteTweet);

router.post('/tweet', postTweet);

router.post('/:tweetId', updateTweet);

export default router;
app.ts
import dotenv from 'dotenv';

dotenv.config();

console.log(process.env.DB_HOST);

import express from 'express';

import cors from 'cors';

import mongoose from 'mongoose';

import adminRoute from './routes/Admin';

const app = express();

app.use(cors());

app.use(express.urlencoded({ extended: false }));

app.use(express.json());

app.use('/', adminRoute);

const port = process.env.PORT || 8080;

mongoose

    // Use DB_HOST_DOCKER to connect to the MongoDB Database in the Docker Container

    .connect(`${process.env.DB_HOST_LOCAL}`)

    .then(() => {
        app.listen(port, () => console.log(`Server and database running on port ${port}, http://localhost:${port}`));
    })

    .catch((err: any) => {
        console.log(err);
    });
.env
DB_HOST_LOCAL="mongodb://127.0.0.1:27017/twitter"

DB_HOST_DOCKER="mongodb://127.0.0.1:2717/twitter"
The application is setup to connect to a local MongoDB database but you can change this in the app.ts file and you can find the database connection strings in the .env file.
Use the command below to start the server.
npm run dev
Testing the API
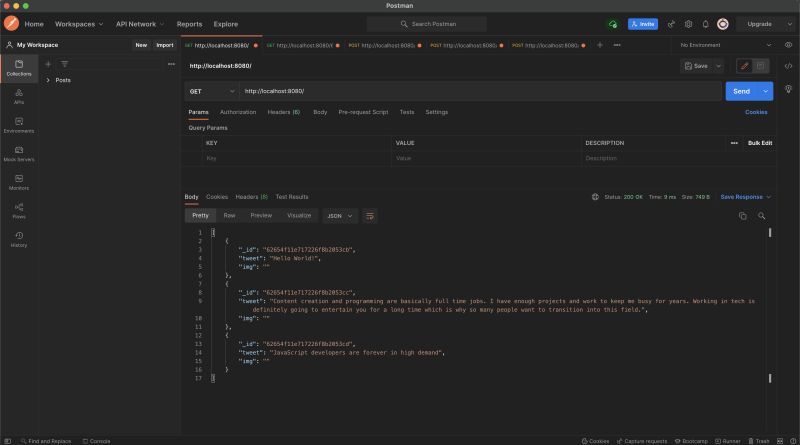
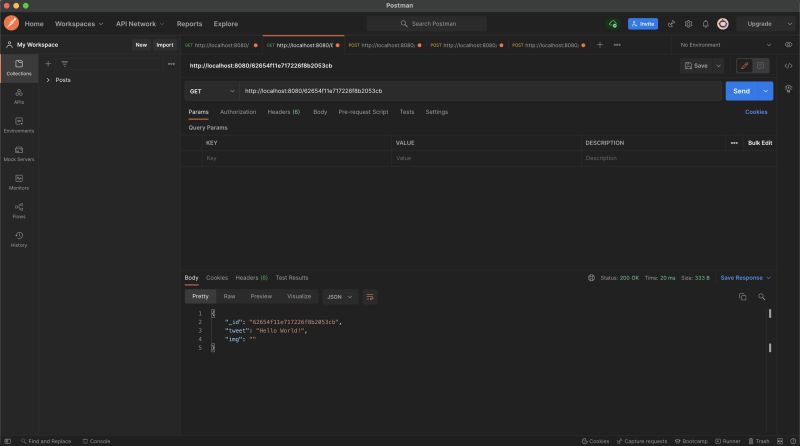
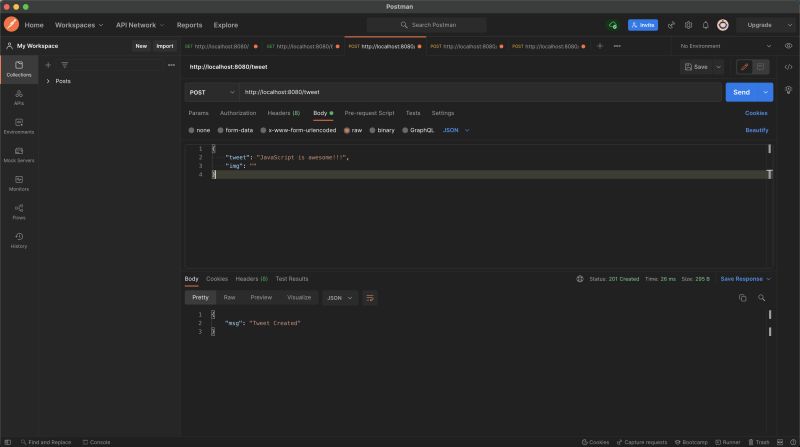
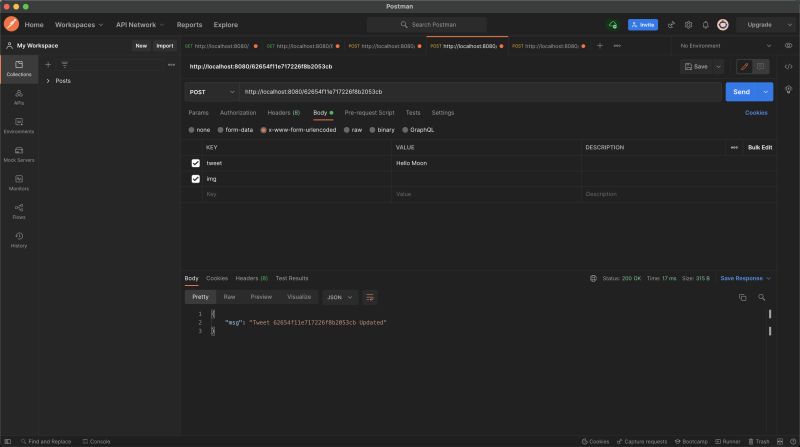
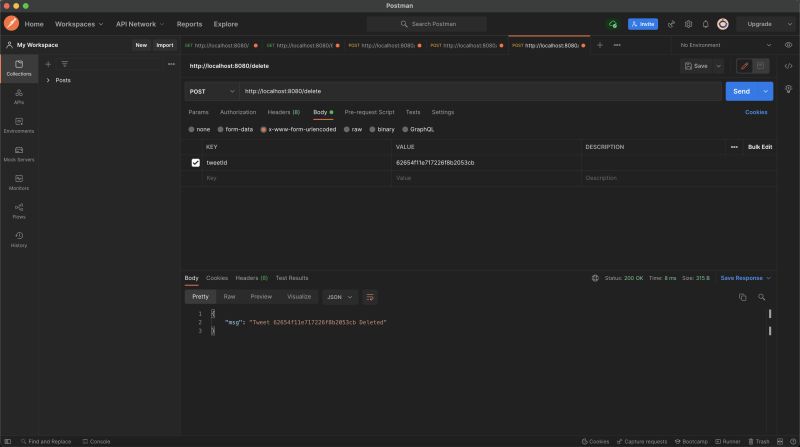
I will be using Postman but you can use whatever API Testing tool you want. If you want to see it fully working the first thing you will have to do is add some data to the database if you have not done so already. Use the Create tweet route for this and see the examples in the screenshots below.
GET all tweets
GET tweet by ID
CREATE tweet
UPDATE tweet by ID
DELETE tweet
Backend Express PostgreSQL
We will be using https://typeorm.io/to create an Express.js application that connects to a PostgreSQL database.
You should be inside of the folder complete-react-developer.
Run the commands below to scaffold your project.
mkdir backend-express-postgresql
cd backend-express-postgresql
tsc --init
npm init -y
npm i express @types/express @types/node ts-node cors @types/cors typescript rimraf copy-files dotenv nodemon pg reflect-metadata typeorm
mkdir src
cd src
touch app.ts app-data-source.ts
mkdir entity
cd entity
touch Tweet.ts
cd ../..
Open the project in your code editor find the tsconfig.json file and replace all of the code inside it with the code below.
{
    "compilerOptions": {
        "lib": ["es5", "es6", "dom"],

        "target": "es5",

        "module": "commonjs",

        "moduleResolution": "node",

        "emitDecoratorMetadata": true,

        "experimentalDecorators": true,

        "rootDir": "./src",

        "outDir": "./dist/src"
    }
}
In the next step open the package.json file and add these run scripts.
"scripts": {

"start": "node dist/src/app.js",

"dev": "nodemon src/app.ts",

"clean": "rimraf dist/",

"build": "npm run clean && tsc && npm run copy-files",

"copy-files": "copyfiles -u 1 src/**/*.html src/**/*.css src/**/*.json dist/src"

},
Add the code below to the corresponding files.
entity/Tweet.ts
import { Entity, Column, PrimaryGeneratedColumn } from 'typeorm';

@Entity()
export class Tweet {
    @PrimaryGeneratedColumn('uuid')
    id: string;

    @Column()
    tweet: string;

    @Column()
    img: string;
}
app-data-source.ts
import { DataSource } from 'typeorm';

export const myDataSource = new DataSource({
    type: 'postgres',

    host: 'localhost',

    port: 5432,

    username: 'postgres',

    password: '',

    database: 'twitter',

    entities: ['dist/src/entity/*.js'],

    logging: true,

    synchronize: true,
});
app.ts
import * as express from 'express';

import { Request, Response } from 'express';

import { Tweet } from './entity/Tweet';

import { myDataSource } from './app-data-source';

// establish database connection

myDataSource

    .initialize()

    .then(() => {
        console.log('Data Source has been initialized!');
    })

    .catch((err) => {
        console.error('Error during Data Source initialization:', err);
    });

// create and setup express app

const app = express();

app.use(express.json());

app.use(express.urlencoded({ extended: false }));

// register CRUD routes

// CREATE

// READ

// UPDATE

// DELETE

// READ: All tweets

app.get('/tweets', async function (req: Request, res: Response) {
    const tweets = await myDataSource.getRepository(Tweet).find();

    res.json(tweets);
});

// READ: Tweet by ID

app.get('/tweets/:id', async function (req: Request, res: Response) {
    const results = await myDataSource.getRepository(Tweet).findOneBy({
        id: req.params.id,
    });

    return res.send(results);
});

// CREATE: New tweet

app.post('/tweets', async function (req: Request, res: Response) {
    const tweet = await myDataSource.getRepository(Tweet).create(req.body);

    const results = await myDataSource.getRepository(Tweet).save(tweet);

    return res.send(results);
});

// UPDATE: Tweet by ID

app.put('/tweets/:id', async function (req: Request, res: Response) {
    const tweet = await myDataSource.getRepository(Tweet).findOneBy({
        id: req.body.id,
    });

    myDataSource.getRepository(Tweet).merge(tweet, req.body);

    const results = await myDataSource.getRepository(Tweet).save(tweet);

    return res.send(results);
});

// DELETE: Tweet by ID

app.delete('/tweets/:id', async function (req: Request, res: Response) {
    const results = await myDataSource.getRepository(Tweet).delete(req.body.id);

    return res.send(results);
});

const port = process.env.PORT || 8080;

// start express server

app.listen(port, () => console.log(`Server and database running on port ${port}, http://localhost:${port}`));
The application is setup to connect to a local PostgreSQL database but you can change this in the app-data-source.ts file. The Docker connection settings can be found in the Docker section if you need them. Don't forget that you need to have your PostgreSQL database setup and running before you can connect to it.
Use the commands below to run the app.
Warning: You might get the error EntityMetadataNotFoundError: No metadata for "Tweet" was found. if you try to use the command npm run dev which uses nodemon to start the application. I think it has something to do with static and dynamic data and the fact that nodemon is auto reloading. So it's safer to use the commands below and just do a clean build using the node server which won't update until you manually restart it.
npm run build
npm run start
You should be familiar with using a REST API tool now however the routes and CRUD requests are slightly different in this example. See the examples below and don't forget to use the CREATE tweet route to add some data into the database so that you can see some data.
GET all tweets
Request: GET Route: http://localhost:8080/tweets
GET tweet by ID
Request: GET Route: http://localhost:8080/tweets/d5d29839-788f-4d23-99ee-82b49ff1bbf1
CREATE tweet
Request: POST Route: http://localhost:8080/tweets Body raw: {"tweet": 'Hello World', img: ""}
UPDATE tweet by ID
Request: PUT Route: http://localhost:8080/tweets/d5d29839-788f-4d23-99ee-82b49ff1bbf1 Body raw: {"tweet": 'Hello Moon', img: ""}
DELETE tweet by ID
Request: DELETE Route: http://localhost:8080/tweets/d5d29839-788f-4d23-99ee-82b49ff1bbf1 Body: x-www-form-urlencoded KEY: id VALUE: Your id
Nest App
Backend Nest MongoDB
It's time to create the Nest backend that will connect to MongoDB. Get inside of the folder complete-react-developer and run the command below. Select your preferred package manager I am going to choose npm. If you choose a different option remember to run the correct commands for it later on.
nest new backend-nest-mongodb
Open the project in your code editor and get ready to generate some controller and service files. We will also install mongoose first cd into the backend-nest-mongodb folder in the command line and run the commands below.
cd backend-nest-mongodb
npm install --save @nestjs/mongoose mongoose
nest g controller twitter
nest g service twitter
Before we create the other project files lets do some file cleanup. Delete the following files:
app.service.ts
app.controller.ts
app.controller.spec.ts
Now it's time to create the rest of the files for this project. Get inside of the root folder for backend-nest-mongodb and run the commands below.
touch src/twitter/twitter.module.ts
mkdir src/twitter/{dto,schemas}
touch src/twitter/dto/create-twitter.dto.ts
touch src/twitter/schemas/twitter.schema.ts
We have created all of the files that are going to be required for this project let's add the code now. Add or replace the code in the existing files with the code below:
app.module.ts
import { Module } from '@nestjs/common';

import { MongooseModule } from '@nestjs/mongoose';

import { TwitterController } from './twitter/twitter.controller';

import { TwitterService } from './twitter/twitter.service';

import { TwitterModule } from './twitter/twitter.module';

@Module({
    imports: [
        TwitterModule,

        // Local MongoDb database

        // Change the port to 127.0.0.1:2717 to connect to Docker

        MongooseModule.forRoot('mongodb://127.0.0.1:27017/twitter'),
    ],

    controllers: [TwitterController],

    providers: [TwitterService],
})
export class AppModule {}
twitter.service.ts
import { Model } from 'mongoose';

import { Injectable } from '@nestjs/common';

import { InjectModel } from '@nestjs/mongoose';

import { Twitter, TwitterDocument } from './schemas/twitter.schema';

import { CreateTwitterDto } from './dto/create-twitter.dto';

@Injectable()
export class TwitterService {
    constructor(@InjectModel(Twitter.name) private twitterModel: Model<TwitterDocument>) {}

    async create(createTwitterDto: CreateTwitterDto): Promise<Twitter> {
        const createdTwitter = new this.twitterModel(createTwitterDto);

        return createdTwitter.save();
    }

    async findAll(): Promise<Twitter[]> {
        return this.twitterModel.find().exec();
    }

    async findOne(id: string): Promise<Twitter> {
        return this.twitterModel.findOne({ _id: id });
    }

    async update(id: string, twitter: Twitter): Promise<Twitter> {
        return this.twitterModel.findByIdAndUpdate(id, twitter, { new: true });
    }

    async delete(id: string): Promise<Twitter> {
        return this.twitterModel.findByIdAndRemove({ _id: id });
    }
}
twitter.module.ts
import { Module } from '@nestjs/common';

import { MongooseModule } from '@nestjs/mongoose';

import { Twitter, TwitterSchema } from './schemas/twitter.schema';

@Module({
    imports: [MongooseModule.forFeature([{ name: Twitter.name, schema: TwitterSchema }])],

    exports: [MongooseModule],
})
export class TwitterModule {}
twitter.controller.ts
import { Controller, Get, Post, Body, Param, Put, Delete } from '@nestjs/common';

import { CreateTwitterDto, TwitterDto } from './dto/create-twitter.dto';

import { TwitterService } from './twitter.service';

@Controller('tweets')
export class TwitterController {
    constructor(private twitterService: TwitterService) {}

    @Post()
    async create(@Body() createTwitterDto: CreateTwitterDto) {
        this.twitterService.create(createTwitterDto);
    }

    @Get()
    async findAll(): Promise<TwitterDto[]> {
        return this.twitterService.findAll();
    }

    @Get(':id')
    async findOne(@Param('id') id): Promise<TwitterDto> {
        return this.twitterService.findOne(id);
    }

    @Put(':id')
    update(
        @Body() updateTwitterDto: CreateTwitterDto,

        @Param('id') id
    ): Promise<TwitterDto> {
        return this.twitterService.update(id, updateTwitterDto);
    }

    @Delete(':id')
    delete(@Param('id') id): Promise<TwitterDto> {
        return this.twitterService.delete(id);
    }
}
schemas/twitter.schema.ts
import { Prop, Schema, SchemaFactory } from '@nestjs/mongoose';

import { Document } from 'mongoose';

export type TwitterDocument = Twitter & Document;

@Schema()
export class Twitter {
    @Prop()
    tweet: string;

    @Prop()
    img: string;
}

export const TwitterSchema = SchemaFactory.createForClass(Twitter);
dto/create-twitter.dto.ts
export class CreateTwitterDto {
    id?: string;

    tweet: string;

    img: string;
}

export class TwitterDto {
    id?: string;

    tweet: string;

    img: string;
}
Everything should be setup now the backend is configured to connect to a local MongoDB database. You can change this to Docker by editing the connection string inside of the app.module.ts file.
Run the command below to start the application in watch mode.
npm run start:dev
One important thing to mention is that by default NestJS applications run on port 3000 which is the same default port that our React application is going to use. So for consistency you might want to change it to 8080 or a different port. You can do this in the main.ts file. Also you will need to enable CORS otherwise you will get that annoying CORS error when you try to connect the backend to the frontend.
main.ts
import { NestFactory } from '@nestjs/core';

import { AppModule } from './app.module';

async function bootstrap() {
    const app = await NestFactory.create(AppModule);

    app.enableCors();

    await app.listen(8080);
}

bootstrap();
The routes should be the same as before here is a refresher that you can test in Postman or whatever REST API tool you are using:
GET all tweets
Request: GET Route: http://localhost:8080/tweets
GET tweet by ID
Request: GET Route: http://localhost:8080/tweets/d5d29839-788f-4d23-99ee-82b49ff1bbf1
CREATE tweet
Request: POST Route: http://localhost:8080/tweets Body raw: {"tweet": 'Hello World', img: ""}
UPDATE tweet by ID
Request: PUT Route: http://localhost:8080/tweets/d5d29839-788f-4d23-99ee-82b49ff1bbf1 Body raw: {"tweet": 'Hello Moon', img: ""}
DELETE tweet by ID
Request: DELETE Route: http://localhost:8080/tweets/d5d29839-788f-4d23-99ee-82b49ff1bbf1
Backend Nest PostgreSQL
Lastly we are now going to create the Nest backend that will connect to PostgreSQL. We will finally move onto the React frontend after this stage. Be sure that you are inside of the folder complete-react-developer and run the command below. Like in the previous chapter select your preferred package manager I am going to choose npm. If you choose a different option remember to run the correct commands for it later on.
nest new backend-nest-postgresql
Open the project in your code editor and get ready to generate some controller and service files. We will also install PostgreSQL and TypeORM so that we can connect to PostgreSQL databases. Firstly cd into the backend-nest-postgresql folder in the command line and run the commands below.
cd backend-nest-postgresql
npm install --save pg @nestjs/typeorm typeorm
nest g controller twitter
nest g service twitter
Before we create the other project files lets do some file cleanup. Delete the following files:
app.service.ts
app.controller.ts
app.controller.spec.ts
Now it's time to create the rest of the files for this project. When you are inside of the root folder for backend-nest-postgresql run the commands below.
touch src/twitter/{twitter.module.ts,twitter.entity.ts}
mkdir src/twitter/dto
touch src/twitter/dto/twitter.dto.ts
We have created all of the files that are going to be required for this project let's add the code now. Add or replace the code in the existing files with the code below:
app.module.ts
import { Module } from '@nestjs/common';

import { TypeOrmModule } from '@nestjs/typeorm';

import { TwitterController } from './twitter/twitter.controller';

import { TwitterService } from './twitter/twitter.service';

import { TwitterModule } from './twitter/twitter.module';

import { Connection } from 'typeorm';

@Module({
    imports: [
        TypeOrmModule.forRoot({
            type: 'postgres',

            host: 'localhost',

            port: 5432,

            username: 'postgres',

            password: '',

            database: 'twitter',

            entities: ['dist/**/*.entity{.ts,.js}'],

            synchronize: false,
        }),

        TwitterModule,
    ],

    controllers: [TwitterController],

    providers: [TwitterService],
})
export class AppModule {
    constructor(private connection: Connection) {}
}
twitter.service.ts
import { Injectable, NotFoundException } from '@nestjs/common';

import { InjectRepository } from '@nestjs/typeorm';

import { DeleteResult, InsertResult, Repository } from 'typeorm';

import { Twitter } from './twitter.entity';

@Injectable()
export class TwitterService {
    constructor(
        @InjectRepository(Twitter)
        private twitterRepository: Repository<Twitter>
    ) {}

    async addTwitter(twitter: Twitter): Promise<InsertResult> {
        return this.twitterRepository.insert(twitter);
    }

    async findAll(): Promise<Twitter[]> {
        return this.twitterRepository.find();
    }

    async findOne(id: string): Promise<Twitter> {
        return this.twitterRepository.findOne(id);
    }

    async update(id: string, twitter: Twitter): Promise<Twitter> {
        const twitterUpdate = await this.findOne(id);

        if (twitterUpdate === undefined) {
            throw new NotFoundException();
        }

        await this.twitterRepository.update(id, twitter);

        return this.twitterRepository.findOne(id);
    }

    async delete(id: string): Promise<DeleteResult> {
        const twitterUpdate = await this.findOne(id);

        if (twitterUpdate === undefined) {
            throw new NotFoundException();
        }

        return this.twitterRepository.delete(id);
    }
}
twitter.module.ts
import { Module } from '@nestjs/common';

import { TypeOrmModule } from '@nestjs/typeorm';

import { TwitterController } from './twitter.controller';

import { TwitterService } from './twitter.service';

import { Twitter } from './twitter.entity';

@Module({
    imports: [TypeOrmModule.forFeature([Twitter])],

    controllers: [TwitterController],

    providers: [TwitterService],

    exports: [TypeOrmModule],
})
export class TwitterModule {}
twitter.entity.ts
import { Entity, Column, PrimaryGeneratedColumn } from 'typeorm';

@Entity()
export class Twitter {
    @PrimaryGeneratedColumn('uuid')
    id: string;

    @Column()
    tweet: string;

    @Column()
    img: string;
}
twitter.controller.ts
import { Controller, Get, Post, Patch, Delete, Param, Body } from '@nestjs/common';

import { TwitterService } from './twitter.service';

import { TwitterDto } from './dto/twitter.dto';

import { Twitter } from './twitter.entity';

@Controller('tweets')
export class TwitterController {
    constructor(private twitterService: TwitterService) {}

    @Post()
    create(@Body() twitter: Twitter) {
        return this.twitterService.addTwitter(twitter);
    }

    @Get()
    findAll(): Promise<TwitterDto[]> {
        return this.twitterService.findAll();
    }

    @Get(':id')
    getOneTwitter(@Param('id') id: string): Promise<Twitter> {
        return this.twitterService.findOne(id);
    }

    @Patch(':id')
    updateTwitter(
        @Param('id') id: string,

        @Body() twitter: Twitter
    ): Promise<Twitter> {
        return this.twitterService.update(id, twitter);
    }

    @Delete(':id')
    deleteTwitter(@Param('id') id: string) {
        return this.twitterService.delete(id);
    }
}
dto/twitter.dto.ts
export class TwitterDto {
    tweet: string;

    img: string;
}
Everything should be setup now the backend is configured to connect to a local PostgreSQL database. You can change this to Docker by editing the connection details inside of the app.module.ts file.
There is one thing of note though this application is using a database table called twitter. Check out the example SQL that you could use for generating some quick test data. If you get an error its probably because its expecting to find a table called twitter.
CREATE TABLE twitter (


id UUID DEFAULT gen_random_uuid (),


tweet VARCHAR(280) NOT NULL,


img VARCHAR(500) NOT NULL


);


INSERT INTO twitter (tweet, img)


VALUES ('Hello World!', ''), ('Content creation and programming are basically full time jobs. I have enough projects and work to keep me busy for years. Working in tech is definitely going to entertain you for a long time which is why so many people want to transition into this field.', ''), ('JavaScript developers are forever in high demand', '');
Run the command below to start the application in watch mode. Like before the routes are quite similar but there are some differences. Also don't forget to change the port to 8080 in the main.ts file. Like earlier you will need to enable CORS otherwise you will get that annoying CORS error when you try to connect the backend to the frontend.
main.ts
import { NestFactory } from '@nestjs/core';

import { AppModule } from './app.module';

async function bootstrap() {
    const app = await NestFactory.create(AppModule);

    app.enableCors();

    await app.listen(8080);
}

bootstrap();
npm run start:dev
You can test in Postman or whatever REST API tool you are using:
GET all tweets
Request: GET Route: http://localhost:8080/tweets
GET tweet by ID
Request: GET Route: http://localhost:8080/tweets/d5d29839-788f-4d23-99ee-82b49ff1bbf1
CREATE tweet
Request: POST Route: http://localhost:8080/tweets Body raw: {"tweet": 'Hello World', img: ""}
UPDATE tweet by ID
Request: PATCH Route: http://localhost:8080/tweets/d5d29839-788f-4d23-99ee-82b49ff1bbf1 Body raw: {"tweet": 'Hello Moon', img: ""}
DELETE tweet by ID
Request: DELETE Route: http://localhost:8080/tweets/d5d29839-788f-4d23-99ee-82b49ff1bbf1 Body: x-www-form-urlencoded KEY: id VALUE: Your id
Setting up the frontend
At long last we reach the frontend section! It wont be anywhere near as long as the backend section we just completed because there will only be ONE React frontend!
Building the Twitter Clone App
The application is going to be a very simple Twitter Clone. You can create, read and delete tweets. There is no option to update/edit tweets which is exactly how it is right now anyway 😂 However the endpoint for updating already exists in the backend so you could implement it if you wanted to. BTW this is not a Twitter Clone course so don't expect it to be pixel perfect and 100% accurate 😁
The codebase is quite large so instead of copy and pasting code a dozen times and going through a long project setup I created the application and put it on GitHub. So all you need to do is clone/download the codebase and run the installation scripts.
https://github.com/andrewbaisden/complete-react-developer
Next open the project in your code editor to see the codebase and use the commands below inside of their respective root folders. The setup instructions are also in the README file.
Setup
Start the Docker Desktop Application on your computer
cd into the root folder for backend-nest-mongodb and frontend and then run the commands below to install the dependencies. You will probably need to force the installation when trying to install the dependencies for the frontend React application in this case otherwise it could give you an error.
# Run this command inside of the backend-nest-mongodb folder
npm install

# Run this command inside of the frontend folder
npm install --force
cd into the root folder for docker-twitter-mongodb and run the command below to start the MongoDB database inside of a Docker Container.
docker compose up
cd into the root folder for backend-nest-mongodb and run the command below to start the backend NestJS server.
npm run start:dev
cd into the root folder for frontend and run the command below to start the frontend React server.
npm run start
Use the routes from the Backend Nest MongoDB section if you want to test them out in your REST API tool.
The Twitter Clone App
You should see your database running inside of a Docker Container and your Twitter Clone React application open in the browser.
Run these commands inside of the root folder for frontend which is where React is. The command below starts Storybook.
# Starts Storybook
npm run storybook
You should see a Storybook component library open in the browser with a component for composing tweets. You can play around and change the names in the control to see how it looks in the demo. The command below runs the unit and integration tests.
# Runs the React testing library unit and integration tests
npm run test
You might need to press a or Enter to trigger a new test run. All of the tests should be passing in your console. The command below starts Cypress.
# Runs the Cypress End-To-End tests
npx cypress open
A new Cypress window should open. Run the integration test and get ready to be amazed as it automatically posts 3 tweets for you! Reload the web page with your React application and you will see the new tweets there too!
The Context API
This application uses the Context API for global state. If you want to get the application to connect to your MongoDB, PostgreSQL or Docker databases then you need to change the API routes and port numbers http://localhost:8080/tweets. The same applies to the methods don't forget that some of them use POST, PUT, PATCH, DELETE etc... It depends on the backend you are using.
src/contexts/TwitterContext.tsx
import { useEffect, useState, createContext, useContext } from 'react';

interface ContextProps {
    data: any;

    loading: boolean;

    handleToggleComposetweet: any;

    toggleComposeTweet: boolean;

    tweet: string;

    setTweet: any;

    postTweet: any;

    deleteTweet: any;
}

const TwitterContext = createContext({} as ContextProps);

export const useTwitter = () => useContext(TwitterContext);

const TwitterContextProvider = (props: any): any => {
    useEffect(() => {
        const getTweets = () => {
            const API = 'http://localhost:8080/tweets';

            fetch(API)
                .then((response) => {
                    console.log(response);

                    return response.json();
                })

                .then((data) => {
                    console.log(data);

                    setLoading(false);

                    setData(data);
                })

                .catch((err) => {
                    console.log(err);
                });
        };

        getTweets();
    }, []);

    const [data, setData] = useState([]);

    const [loading, setLoading] = useState(true);

    const [toggleComposeTweet, setToggleComposeTweet] = useState(false);

    const [tweet, setTweet] = useState('');

    const handleToggleComposetweet = () => {
        toggleComposeTweet === true ? setToggleComposeTweet(false) : setToggleComposeTweet(true);
    };

    const postTweet = () => {
        if (tweet === '') {
            let myHeaders = new Headers();

            myHeaders.append('Content-Type', 'application/json');

            let raw = JSON.stringify({
                tweet: 'Congratulations this is what happens when you post an empty tweet 🤪 Create some validation 🙃',

                img: '',
            });

            fetch('http://localhost:8080/tweets', { method: 'POST', headers: myHeaders, body: raw, redirect: 'follow' })
                .then((response) => response.text())

                .then((result) => console.log(result))

                .catch((error) => console.log('error', error));
        } else {
            let myHeaders = new Headers();

            myHeaders.append('Content-Type', 'application/json');

            let raw = JSON.stringify({
                tweet: tweet,

                img: '',
            });

            fetch('http://localhost:8080/tweets', { method: 'POST', headers: myHeaders, body: raw, redirect: 'follow' })
                .then((response) => response.text())

                .then((result) => console.log(result))

                .catch((error) => console.log('error', error));
        }
    };

    const deleteTweet = (tweetId: string) => {
        console.log('Deleted', tweetId);

        let urlencoded = new URLSearchParams();

        fetch(`http://localhost:8080/tweets/${tweetId}`, {
            method: 'DELETE',

            body: urlencoded,

            redirect: 'follow',
        })
            .then((response) => response.text())

            .then((result) => console.log(result))

            .catch((error) => console.log('error', error));

        window.location.reload();
    };

    const value = {
        data,

        loading,

        toggleComposeTweet,

        handleToggleComposetweet,

        postTweet,

        tweet,

        setTweet,

        deleteTweet,
    };

    return <TwitterContext.Provider value={value}>{props.children}</TwitterContext.Provider>;
};

export default TwitterContextProvider;
Testing with React Testing Library and Jest
There are two test files one for App.test.tsx and one for TwitterMenu.test.tsx.
I will show the example for App.test.tsx. These tests just test to see if the required text is displaying on the page. Each component should have a test file to go alongside them.
App.test.tsx
import { render, screen } from '@testing-library/react';

import App from './App';

describe('<App />', () => {
    it('has a following text label', () => {
        render(<App />);

        const el = screen.getByText(/Following/i);

        expect(el).toBeTruthy();
    });

    it('has a followers text label', () => {
        render(<App />);

        const el = screen.getByText(/Followers/i);

        expect(el).toBeTruthy();
    });

    it('has a you might like heading', () => {
        render(<App />);

        const el = screen.getByText(/You might like/i);

        expect(el.innerHTML).toBe('You might like');
    });

    it('has a whats happening heading', () => {
        render(<App />);

        const el = screen.getByText(/Whats happening/i);

        expect(el.innerHTML).toBe('Whats happening');
    });
});
End-To-End Testing with Cypress
This Cypress test will automatically post 3 tweets. It's all done in real time and the tweets will show up in your database and on the live application.
cypress/integratioin/tweet.spec.js
describe('user form flow', () => {
    beforeEach(() => {
        cy.viewport(1600, 900);

        cy.visit('http://localhost:3000/');
    });

    it('user posts a tweet', () => {
        // Post a tweet

        cy.get('.compose-tweet-btn').click();

        cy.get('textarea[name="tweet"]').type(
            'What happened to all that fun you were having?! Come on, lets try to enjoy this!'
        );

        cy.wait(3000);

        cy.get('.post-tweet-btn').click();
    });

    it('user posts a second tweet', () => {
        // Post a tweet

        cy.get('.compose-tweet-btn').click();

        cy.get('textarea[name="tweet"]').type('That was an Attack on Titan easter egg 🥚 😄');

        cy.wait(3000);

        cy.get('.post-tweet-btn').click();
    });

    it('user posts a third tweet', () => {
        // Post a tweet

        cy.get('.compose-tweet-btn').click();

        cy.get('textarea[name="tweet"]').type(
            'The Rumbling arrives on Marley 😱 https://www.youtube.com/watch?v=wT2H68kEmi8'
        );

        cy.wait(3000);

        cy.get('.post-tweet-btn').click();
    });
});
Deployment
When you have completed building your application the final step is deployment. You need to get your application online so that everyone can see it. There are dozens of platforms out there but here are my top 5 platforms in no particular order.
Final Thoughts
We covered all of the MERN stack including TypeScript, SQL, Test Driven Development, End to End Testing and even Docker! Congratulations you just became super awesome because you boosted your skills and job prospects 🔥🚀
Play around with the databases and React frontend there is so much you can do with it. Like for example creating more Storybook components, integration tests, adding the functionality to edit tweets and getting media like images and video to show up in the tweets.

